I always have trouble finishing up these website posts. I have no idea what to write as far as an introduction to this post. It's been two weeks since I made these, and I can't think of what to say or what I was even thinking when I made them. But it's time to post.
Oh well. Sorry.
Anyway.
Here is a video. And a written tutorial. With pictures.
I came up with the idea for these projectiles when I realized that caulk tubes fit nearly perfectly in my 2" diameter spud gun barrel. All it takes for a perfect seal is a bit of tape. (I used some toilet paper to save a little tape)
All that was left was to make them deadly. I went to the hardware store and found some ridiculously tiny nails. Like really tiny. No idea what they could be used for, they are so small.
I found three methods for affixing them to caulk tubes.
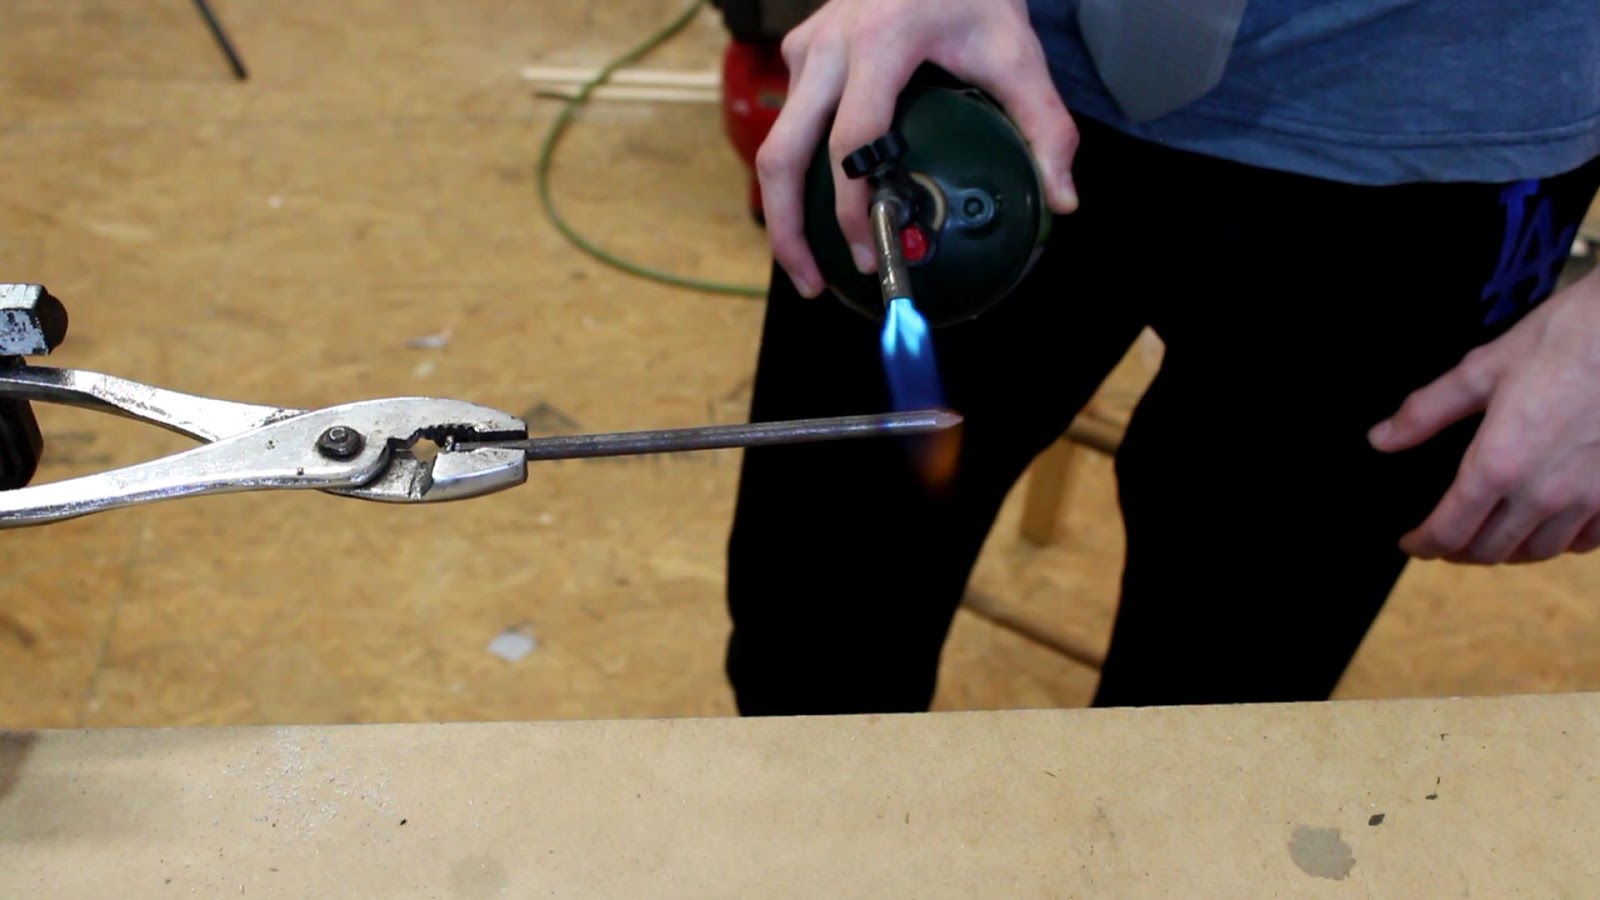
Method #1: the Worst
First I heated up the nail with my blowtorch, and used it to melt the holes I needed in the front and back.
Then I stuck it upside down in my vice, set the nail into the hole in the back, and endeavored to push it through. Not happening. The hole was too small. So I grabbed a hammer and pounded on it for about three years.
Method #2: Less Worse
Instead of making a hole through both sides of the tube, for the next one I decided to come from the other end, turn the nail around and hammer it into the nozzle of the caulk tube. That was much easier.
Then I cut off the head of the nail with the angle grinder and ground a new point where the head had been.
Method #3: Least Worst
By this time I realized you could just drill out the holes through both sides of the tube. Making them the perfect size for the nail. Then I hammered the nail into place (much easier than last time).
This is the method I would recommend you use.
Final Step: Spraypaint an awesome color of your choice while completely totally standing in the way of your camera
I nailed this step perfectly.
Here is a beauty shot of one of the finished demon darts. Beautiful, I know.
And some testing. These projectiles surprised me. I wasn't expecting the amount of power I actually got. They drove the nails all the way into my backstop (half inch OSB), destroyed paint cans, and went through both sides of a plastic five gallon bucket. Pretty powerful.
Unfortunately, while certainly effective this version at least of lethal ammo is also rather fragile. To my ultimate dismay and incomprehensible disappointment they all went into a self destruct sequence after only a few shots. The plastic simply wasn't able to hold together under the pressure.
the carnage....
I'm tired of what little writing i've done, so I'll just end this post.
This is Jake's unofficially official guide to all flammable substances that come out of a can. Think cooking spray, deodorant, engine starter, hairspray, etc. What they are, how to tell if they are flammable or not, flame size, danger factor, whether they'll work to power your spud gun, and all that other good stuff for my pyromaniac friends.
Note: I am not the complete expert on all these substances, and I have not had the chance to test yet everything that's out there. I will be updating this list as I experiment with more, so I'd loveyourrecommendations.
Ready or not, here we go.
1. Hairspray (the classic)
As far as flamethrowers go, hairspray has an average to small flame.
I'll also mention an interesting thing I've noticed about hairspray; it seems to have a flammability shelf-life of sorts. I don't understand it, and I may be mistaken, but all the cans I've used have lost their potency after about a year of sitting on the shelf. They aren't nearly as powerful, and they don't have much of a flame anymore. Strange.
Is it good for Spud Guns?
This is the classic for powering tater guns. It works well, and is powerful. The only downside to its use is the sticky residue it leaves behind. That nasty sticky stuff has annoying tendency to glue the screw cap on tight as heck. If you don't clean your threads before putting it away after each use, you will need a really big wrench and a whole ton of elbow grease to get it off again. Other than that, the results are generally satisfactory, although the power tends to vary a little between brands. Aqua-Net is the brand I usually use.
2. Spray Deodorant
Another classic. If I had a buck for every prank video on YouTube involving a can of Axe, a lighter, and a couple of blonde teenagers, dang, I could build some really awesome stuff. It works very well, with a large flame.
Is it good for Spud Guns?
Yes. It works great of spud guns. a tad more powerful than hairspray, but without the glue effect.
3. Spray Paint
Spray paint is great. Very flammable, good flame size. Danger factor is average. Not much to say here.
Metallic Silver spray paint:
Burn is the same as regular spray paint, except it has flecks of metal in it that when burned make a cool sparkling effect. I have found that the textured kind makes more sparks (the camera doesn't capture the effect unfortunately).
Metallic Gold spray paint:
Burns with an incredible blue/green flame, which is absolutely awesome. It also puts off a bit of white smoke. This is a really awesome reaction. The blue/green fire is very cool. It also has the sparkling effect like the silver, due to the flecks of metal in it. Why green flames? Probably because of copper alloy in the paint, used to give it the gold color. Danger factor? About the same as regular spray paint. I would be careful about breathing the fumes created by any of these. Spray paint is bad enough to breath on its own, and burning it won't improve that.
Is it good for Spud Guns?
As far as performance goes spray paint is very good, better than hairspray. However it is after all paint, and using it in my spud gun means the combustion chamber will have a new look. If you don't mind painting up your gun, then I suppose you could use it. I don't. You also may need to be careful as many spray paints have chemicals like acetone in them, which can probably eat away the PVC after a while.
4. WD-40
I've read that the company changed what was in it recently and it's less flammable than it was previous. In my experience it's about average, but does not put out as fine of a spray, and the flame shape reflects that. Flame size is similar to spray paint, darker in color, and is very uniquely shaped. It puts off a bit of smoke when burned, and an educated guess would say that you probably shouldn't breath it. There is also a large bit of unburned waste spraying off into the air when burned. Danger factor? Average.
Is it good for Spud Guns?
I would say no. It would probably work in a pinch, but due to the fast shooting nozzle, and not a very fine spray (after all, this is designed to shoot large amounts of oil onto things, not to put out a wellatomized mist), as well as a good amount of waste, I don't think you would get much success.
5. Silicone Lubricating Spray
Similar to WD-40 in that it puts off a lot of waste. Flames are hot, bright yellow/orange with a large spread but very short range, due to the throw of the nozzle. Danger factor is a little higher than normal, because the spray goes wide, and doesn't have much range, so the fire is closer to the can than with the others. It feels a bit hotter than usual as well (which may just be because the flames are closer to my hand). I prefer to wear gloves with this one.
Is it good for Spud Guns?
Well, I don't use it. Would it work? Yes. It does work. However it simply has too much waste for my taste, and silicone spray has an annoying way of getting everywhere, due to the very wide, very fine spray. The combustion chamber will be coated with large amounts of silicon oil, as well as your hands, your clothes, and anything else near you.
6. Cooking Spray
You'd suppose a spray you use all the time within close proximity to your stove would be designed to be less flammable. Apparently not. I've personally tested 4 variants of this stuff, and they are all very impressive flame-throwers. As you can see from the picture. Flame size is a notch larger than spray paint.
Is it good for Spud Guns?
Yes, it works great for spud guns. Much like silicone spray though, it puts off quite a bit of waste. If you're fine with that, then go ahead.
7. Wasp/Hornet Killer
Will not burn at all. I have tried every can I've got my hands on with zero success. It is not flammable in the least.
Is it good for Spud Guns?
Not applicable.
8. Engine Starter
Absolutely epic. This is the most flammable stuff that comes out of a can. It puts out 5 foot flames easy. Danger factor? On a scale of 1-10, this would be a 12. Very dangerous, extremely fast burning, and a considerably hot burn temperature. Remember, this stuff is used to help old rusty engines get going again when regular gasoline apparently isn't cutting it. In other words, this is more flammable, starts easier, burns faster, and burns hotter than gasoline. So, yeah. It's dangerous. You need to exercise extreme caution when using this stuff. Unlike the other sprays in this list, Engine Starter is not just flammable while in the air. It's every bit as dangerous on the ground. While this makes it a very cool thing to play with, (all the fun of gas in a nice easy to use portable spray can), it also gives it a new level of danger. With any of the other sprays, when suspended in the air they burn rapidly, but when that spray falls on the ground they no longer burn, as they aren't really flammable unless in the air exposed to oxygen on all sides. That makes them (relatively) safe to use. Not so with this stuff. On the ground it acts just like gasoline. Be careful.
Is it good for Spud Guns?
Don't risk it. This stuff is simply too volatile. Think gasoline in a spray can. You would not use gas in your potato cannon. Don't use this either. Not to mention that as a petroleum product similar to gasoline, there is a pretty good chance it would start eating through the polyvinyl-chloride, turning your combustion chamber into a gooey flaming (and probably toxic) mess.
9. Propane
Once again, not exactly an aerosol, however in a post in which I am discussing flamethrower fuel and spud gun propellant it simply must be mentioned. It's very flammable, easy to use, and with the proper setup makes for an excellent flamethrower. In the picture above I am using it in what I call my propane gun.
Is it good for Spud Guns?
Yes it is. I have recently began to use it in my marble guns actually, and I've had very good success. I really love the fact that there is absolutely no residue left over after firing, and since it's a gas, I find it easier to use.
10. Butane
Butane is very similar to propane. Flame size and burn are practically identical. The main difference (from an unscientific standpoint) is that propane is stored under much higher pressure.
Is it good for Spud Guns?
Same as propane, if you can figure out a way to get it from the can to your combustion chamber. Because butane is lighter fuel, the cans have a nozzle specifically designed to be inserted into a lighter, and don't have the nice spray nozzle that the others do. You'd have to rig some kind of adapter.
11. Polyurethane/Lacquer Spray
Flame size is about the same as spray paint, but because it is a wood finisher, they have a slightly different shaped spray nozzle, which in turn makes a different shaped flame. As you can see, this flame is shorter and taller than many of the others.
Is it good for Spud Guns?
For the same reasons as spray paint, I wouldn't use it. Otherwise I'm sure it would work great.
And that's about all I have so far.
How do I Tell if This Stuff Will be Flammable?
Obviously, the best way is to just grab a lighter and light it up. Nothing like seeing it in action. However, there is going to be a lot of times when you need to tell if a certain brand of, say, Hairspray will produce a good exothermic reaction. You can't, after all, just light it up in the aisle at Walmart. (Well, I wouldn't recommend it.) You will need to be able to tell from the label whether or not it will light up in flames, just smell really bad (adding insult to injury). Otherwise you'll waste a lot of money on not-so-cool un-flammable aerosols.
Here are some things to look for:
First of all, look at the warning labels. If its flammable on a dangerous level, the can will say so.
Another thing to mention would be not to go with 'natural' junk. For flamethrower purposes, the more toxic it is, the better. You will notice on just about all of these products that there are warnings about ingesting it, inhaling it, getting it on your skin, in your eyes, etc. As a general rule of thumb, the more flammable something is, the more dangerous it is for your health. If you see a can of something marked 'natural', my advice would be to stay far, far away.
The other thing is, quite obviously, the ingredients. If you know what substances are flammable, then you'll know a spray that contains it has a good chance of being flammable too. For instance, I know that acetone is highly flammable. The label of this can of spray paint says it contains acetone. Thus, I know the spray paint has a very good chance of spraying satisfactory fireballs. Alcohol is also very flammable, and is an ingredient found on the label of just about every can of hairspray out there. Another thing to look for is butane or propane, which are often the propellent gases for these products (as demonstrated by this can of deodorant). Other than those things, really you just have to test them.
If you guys think of any others I should test, by all means let me know. I'd love to add to this post, and perhaps make a part 2 of the video.
I've been wanting to build a simple, electrically operated air gun for quite some time now. There are a number of cool things you can do with them (remote detonation and sentry gun, to name a couple), not even counting the ease of use that a simple electric trigger has over a rubber powered ball valve (as on my air rifle), which has to be reset after each shot.
But I already had a rifle. Sure, it doesn't have an electric valve, but still. I don't need another one.
Yet.
This moment anyway.
So logically, I built a cannon. (What else?)
Parts and Materials:
- 2" PVC pipe (two foot length) (all PVC parts are schedule 40)
- A short length of 3/4" PVC pipe
- 2" end cap
- 2" straight coupling
- A fitting that goes from the 2" straight coupling to the 3/4" threaded fitting. I couldn't find a fitting that went down to 3/4" directly, so I had to use several fittings to step down.
- Bike tire valve (I cut mine off of an old inner tube)
- PVC cement and primer
- Thread sealing tape
And I think that's about everything.
Sorry if my parts list is rather foggy, at the store I'm really not thinking of individual parts; I'm more just throwing the stuff that fits together in a bag and calling it good.
Really though, you can't get any simpler than this cannon design. I'm sure you can figure it out. After all; where there's a will, there's a way.
Better hope you know somebody named Will..........
Here is a diagram of how the sprinkler valve works, for those who want to understand it better. I explained it a bit in the video, if that helps. I always like to study and understand what I'm working with.
Step 1: Design
My design for this cannon was basically the simplest one I could come up with. Literally tank + valve + barrel. Nothing fancy here. One of my goals for this project was to make the simplest air cannon I could. Not sure why.
The main thing that might vary on your cannon is the barrel and how you attach it. I designed this gun so I could use interchangeable barrels, which is a very cool feature in my opinion.
Step 2: Cutting Pipe to Length
With your parts dry fitted together, you can see where the PVC needs to be cut down. My design, being so simple only requires two cuts. I cut the 2" pipe down to 20" (air tank), and cut about a 1" long piece of the 3/4" pipe to connect two of the male couplings together.
Step 3: Installing Valve
Being the redneck fellow that I am, I opted for the cheap method and used a valve I cut out of an old bike inner tube.
A better idea would be to buy a metal valve at the hardware store, which can be threaded right into the PVC of the air tank.
Not that the redneck option is more likely to fail, actually I have used them on several airguns; and they have held up wonderfully in my experience (no worries there). But a metal valve would be nice.
First I drill a hole in the top of the end cap, just large enough for the end of the valve to slide through. Then I glue the two permanently together using five minute epoxy. I rigged the parts up in my vice so I wouldn't have to hold them together while the epoxy cured.
Step 4: Coffee Break
Most important part of the whole build.
Step 5: Cleaning PVC
If the air tank wasn't going to have to hold together at 80 psi, cleaning the PVC before gluing wouldn't matter.
But it is. And if you are anything like me, you generally don't appreciate parts of your gun flying off at random times.
It gets annoying.
Yeah.
So to be extra sure that everything will hold together, it is best to clean the PVC well before slapping cement and primer on it. I used some denatured alcohol to get the surfaces as clean as possible.
Step 6: Priming and Gluing the junk up.....
The second most important part of the whole build. (Better get your priorities in order. Coffee first. Always.)
First of all, do this in a well ventilated area or outdoors. This junk smells like nothing else, and according to the warnings on the can, is as bad for you as it smells. Don't breathe it.
Its fairly easy to use. Apply the primer, let it dry for a few minutes, and apply the cement (don't go crazy with it, but don't put too little either). Push the pieces fully onto each other, one quarter turn; and boom. Instant bond.
I'm always extra careful in this step. Remember that the parts must hold considerable pressure. If one of your joints doesn't get a good bond, you could be in serious trouble later when pressurizing this thing. Follow the directions on the can, and you should be good.
Step 7: Connecting Valve
The sprinkler valve threads right onto the male adapter coming from the air tank. Because the threads often don't make a perfect air seal, be sure to use some thread sealing tape.
My solenoid valve is also a one directional valve, with arrows telling me what side the inflow and outflow needs to be. I believe most solenoids are, so be sure to get that right. Otherwise the valve won't work.
And it would be nice if the valve worked.
Step 8: Handle
At this point, the gun was about finished, all but the wiring.
But it was missing something. I realized it needed a handle somewhere.
No problemo. A few minutes and a scrap piece of 1x6" (ish) and it was good to go. Yeah, I attached it with duct tape (greatest invention of mankind). A better method would be to use a couple of those ratcheting pipe clamps, but I didn't have any on hand and didn't feel like waiting till I could get to the store.
Step 9: Wiring up the Solenoid
First a confession: the pics you have here are of me wiring it wrong. Somehow I managed to miswire the most simple circuit in existence.
No worries, look at the diagram and you can't mess it up.
(^^ I'm lying. You still can.)
Anyway. I rewired it off camera and got it right.
At first I thought a single 9v battery would be sufficient to power the valve. It worked to open the valve at low pressures great, so I just assumed the same would go for as much pressure as i'd put in it.
I was wrong. As soon as I got the air pressure above 40 psi the single 9v would not open the valve. I quickly hooked up an 18v drill battery, and it opened no problem. So as you can see from the pictures, I wired together two 9v's, which of course brings me up to 18v. And that has worked great.
For those wondering why I am just duct taping everything together: I am not doing that just because I am too lazy to figure out a better way. Actually, I am planning on experimenting with other ways of triggering this gun in the future (different switches, remote detonation, motion sensor, etc), so I am not wanting to set the design in stone here. You can do it more permanently.
I am calling this spud gun a cannon, as that was my main purpose for this gun, but since I made it to take interchangeable barrels, it can really be anything I want!
So far I have made four barrels for the gun; a 3", 2", 1&1/2", and a 3/4" rifle barrel.
TESTING TIME!!!
Pump up the gun to 80 psi. I'm not going to be going higher than 80 psi for this gun, as that is what the valve is rated at. The PVC is safe past 100, but as I don't feel like blowing out my valve i'm calling the limit at 80.
FIRE!!!!!
Unfortunately, the gun ended up being not quite as powerful as I'd hoped. It is not as powerful as my combustion powered spud gun, and only fired tubers about 80 yards. Not very impressive. Looking back, I should have used a larger air tank. It is plenty of air for my smaller barrels, but when I go up to the larger diameter barrels (which take more air volume to pressurize sufficiently) the shots are underpowered. Bummer.
Watch the video if you want to see the full test. A description is about worthless.
To wrap up: if I were to build this again, I would make the air tank about twice the size it is now. I would also use a larger diameter solenoid, which would hopefully increase the amount of air released into the barrel at the instant the valve is opened. That should give me the increased power for larger barrels that I am looking for. Oh well, it's a learning experience. The cannon is still plenty of fun.
I'm thinking about painting the thing. Any suggestions?